GPS Tracks Manual
 GPS Tracks Manual
GPS Tracks Manual.pdf
Select a Feature
- F.A.Q.
- How to Use the Functions on the Map
- Record Your Track
- Navigate to a List of Waypoints
- GPS Tracks Pro Subscription
- GPS Tracks Live
- Track Sharing
- GPS Data / Compass
- Map Measurement Tool
- Track Guidance
- Adding and Saving Waypoints
- Create a Route Manually
- Convert Coordinates
- Send a Link to a Location
- Getting Directions
- Siri
- Import
- Export
- Opening Files with GPS Tracks
- Settings
- Troubleshooting
- x-callback-url
How to Use the Functions on the Map

There are two main Map controls, the map toolbar and the map menu. The map toolbar can be found at the right side of the map and will contain items such as center user, zoom in/out, and map menu, measure, and search. The map menu can be accessed through either the toolbar or by long pressing on the map for 2 seconds to reveal the context menu.
Map Toolbar
The map toolbar can be found on the right side of the map. It is fully customizable, even to the point that it is not present. If you have removed the map menu function from the toolbar you can long press on the map for two seconds to reveal the context menu and subsequently access the map menu. See the list of functions that can be added to the map toolbar below.
- Center User Location
- Zoom In/Out
- Search Map
- Measure Map
- Change Map Type
- View Map Menu
Map Menu
The map menu can be accessed in two ways. Either from the map toolbar or by long pressing on the map for two seconds to reveal the context menu. The map menu has the following functions below.
- View Waypoints on Map
- View Tracks on Map
- Change Map Type
- Search for Waypoints
- Change Map Type
- Get Directions for Track
- Show/Hide Waypoint Toolbar
- Show/Hide Compass
- Show/Hide Dashboard
- Customize the map toolbar
Context Menu
The context menu can be found by long pressing on the map for two seconds. It contains three functions and it is not customizable.
- Add Waypoint at location of the tap
- Center User Location
- View Map Menu
Dashboard
If the dashboard is not present, then it can be shown in one of two methods. First you can tap near the top of the map to bring it into view. Second you can swipe down near the top of the screen on the visible bar to slide it into view. The dashboard is fully customizable. You can tap any of the five data items to change the content. This is similar to the track view.
Map Download

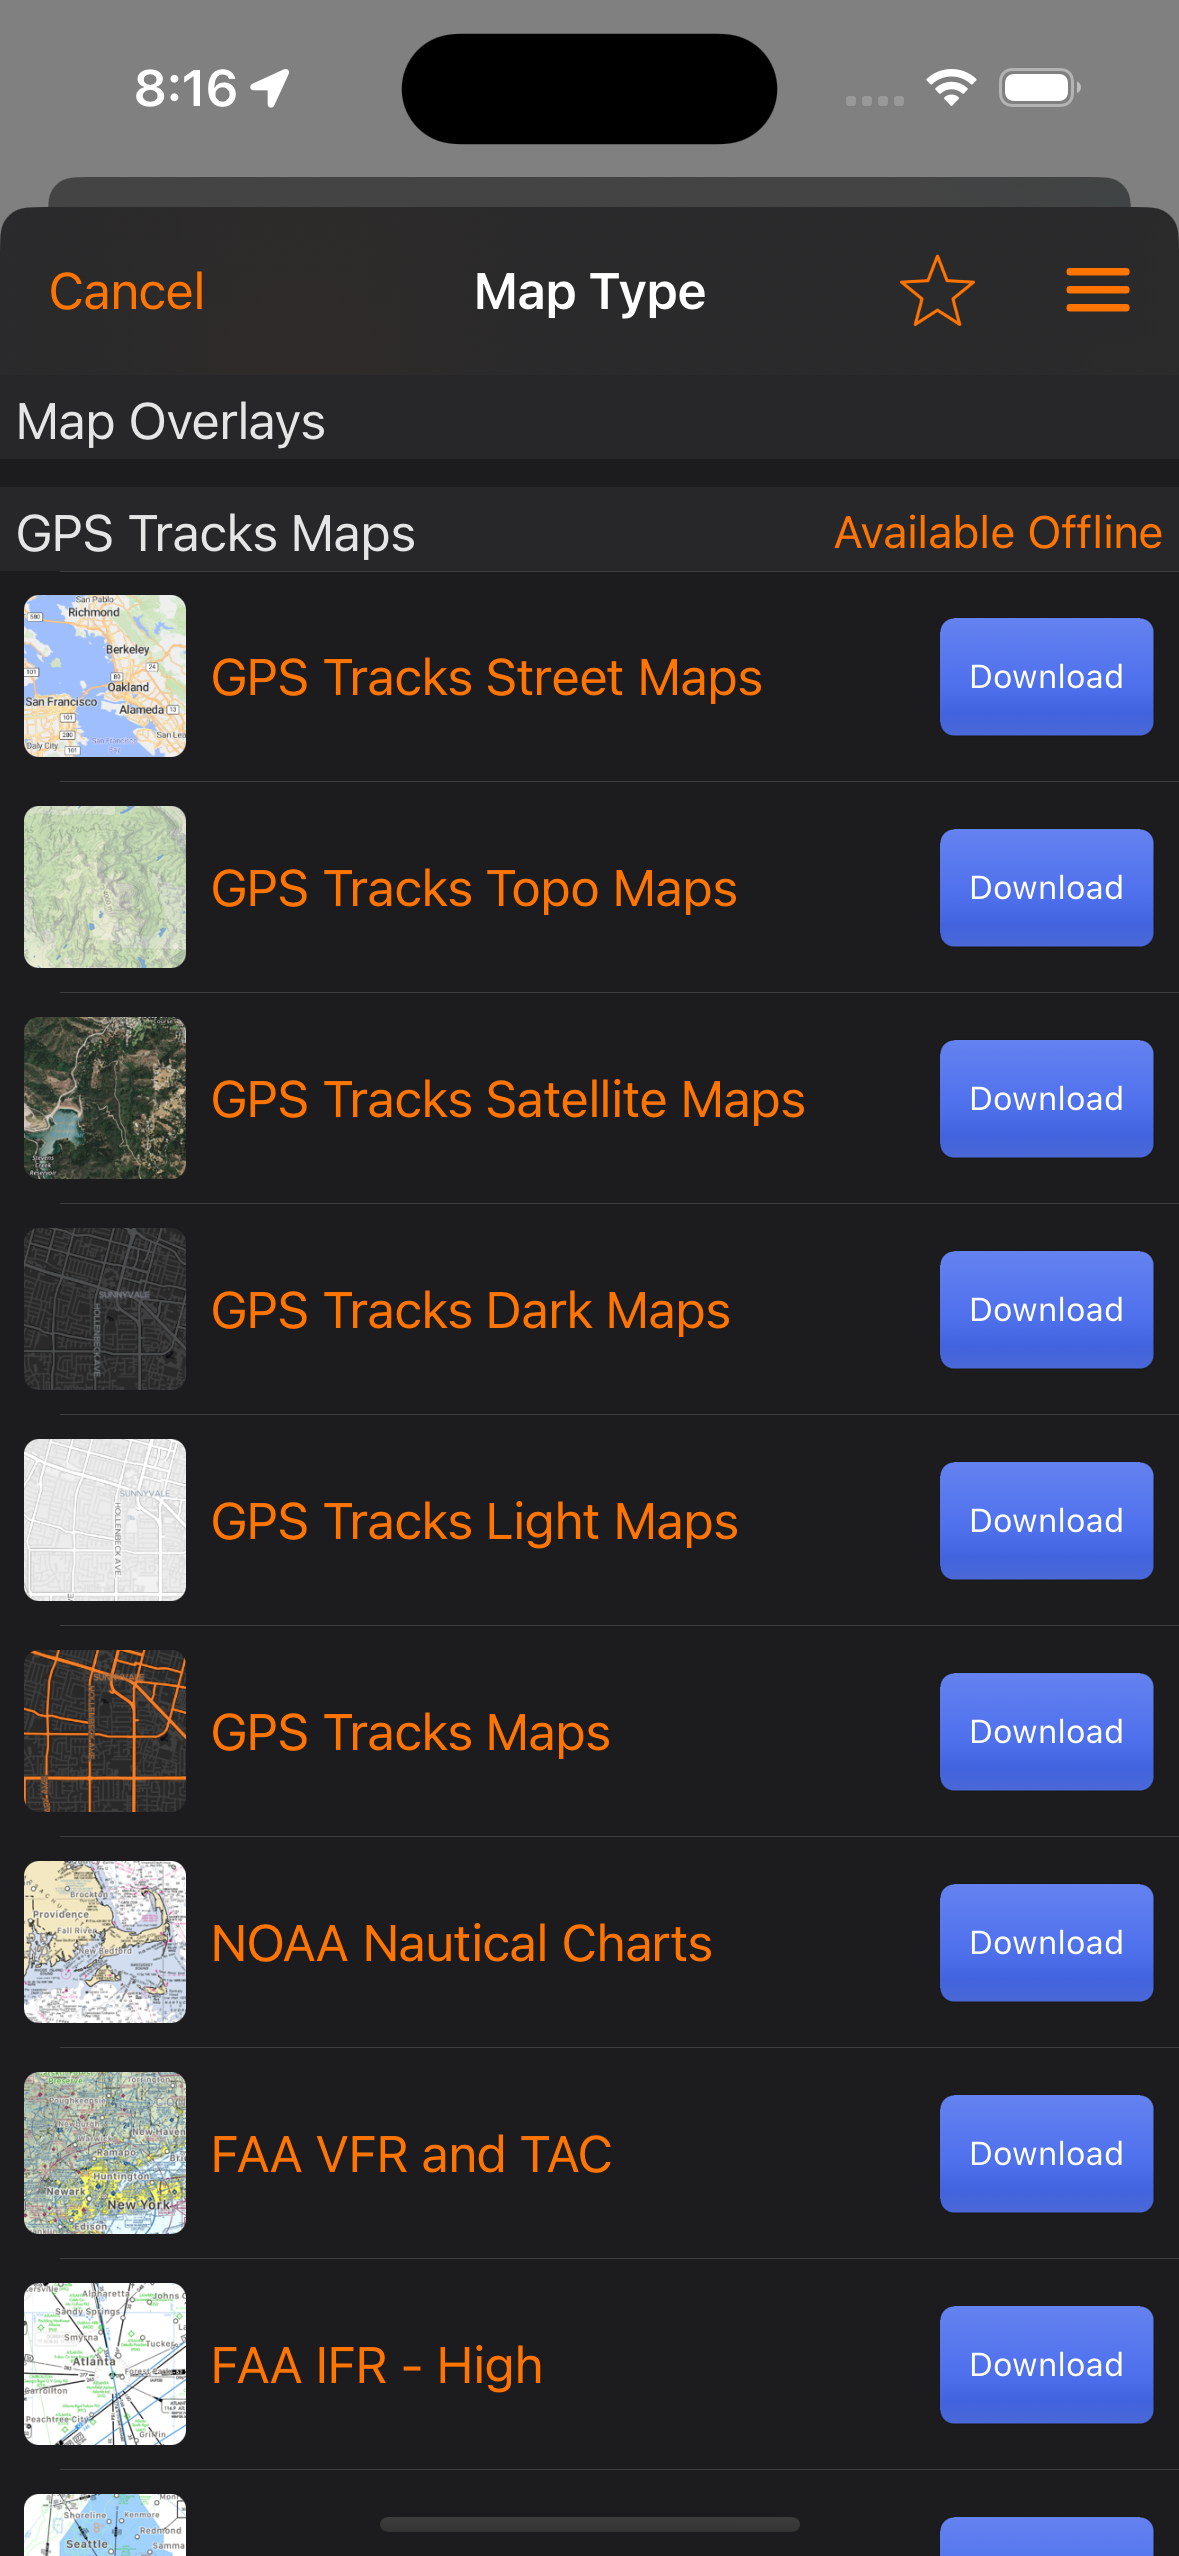
To download maps for offline use, tap on the Map Type button shown above. Then select the map type that you want to download and tap on the blue Download button. Each map type must be individually downloaded for offline use. If there is no blue Download button next to the map type then it is not available for offline use.
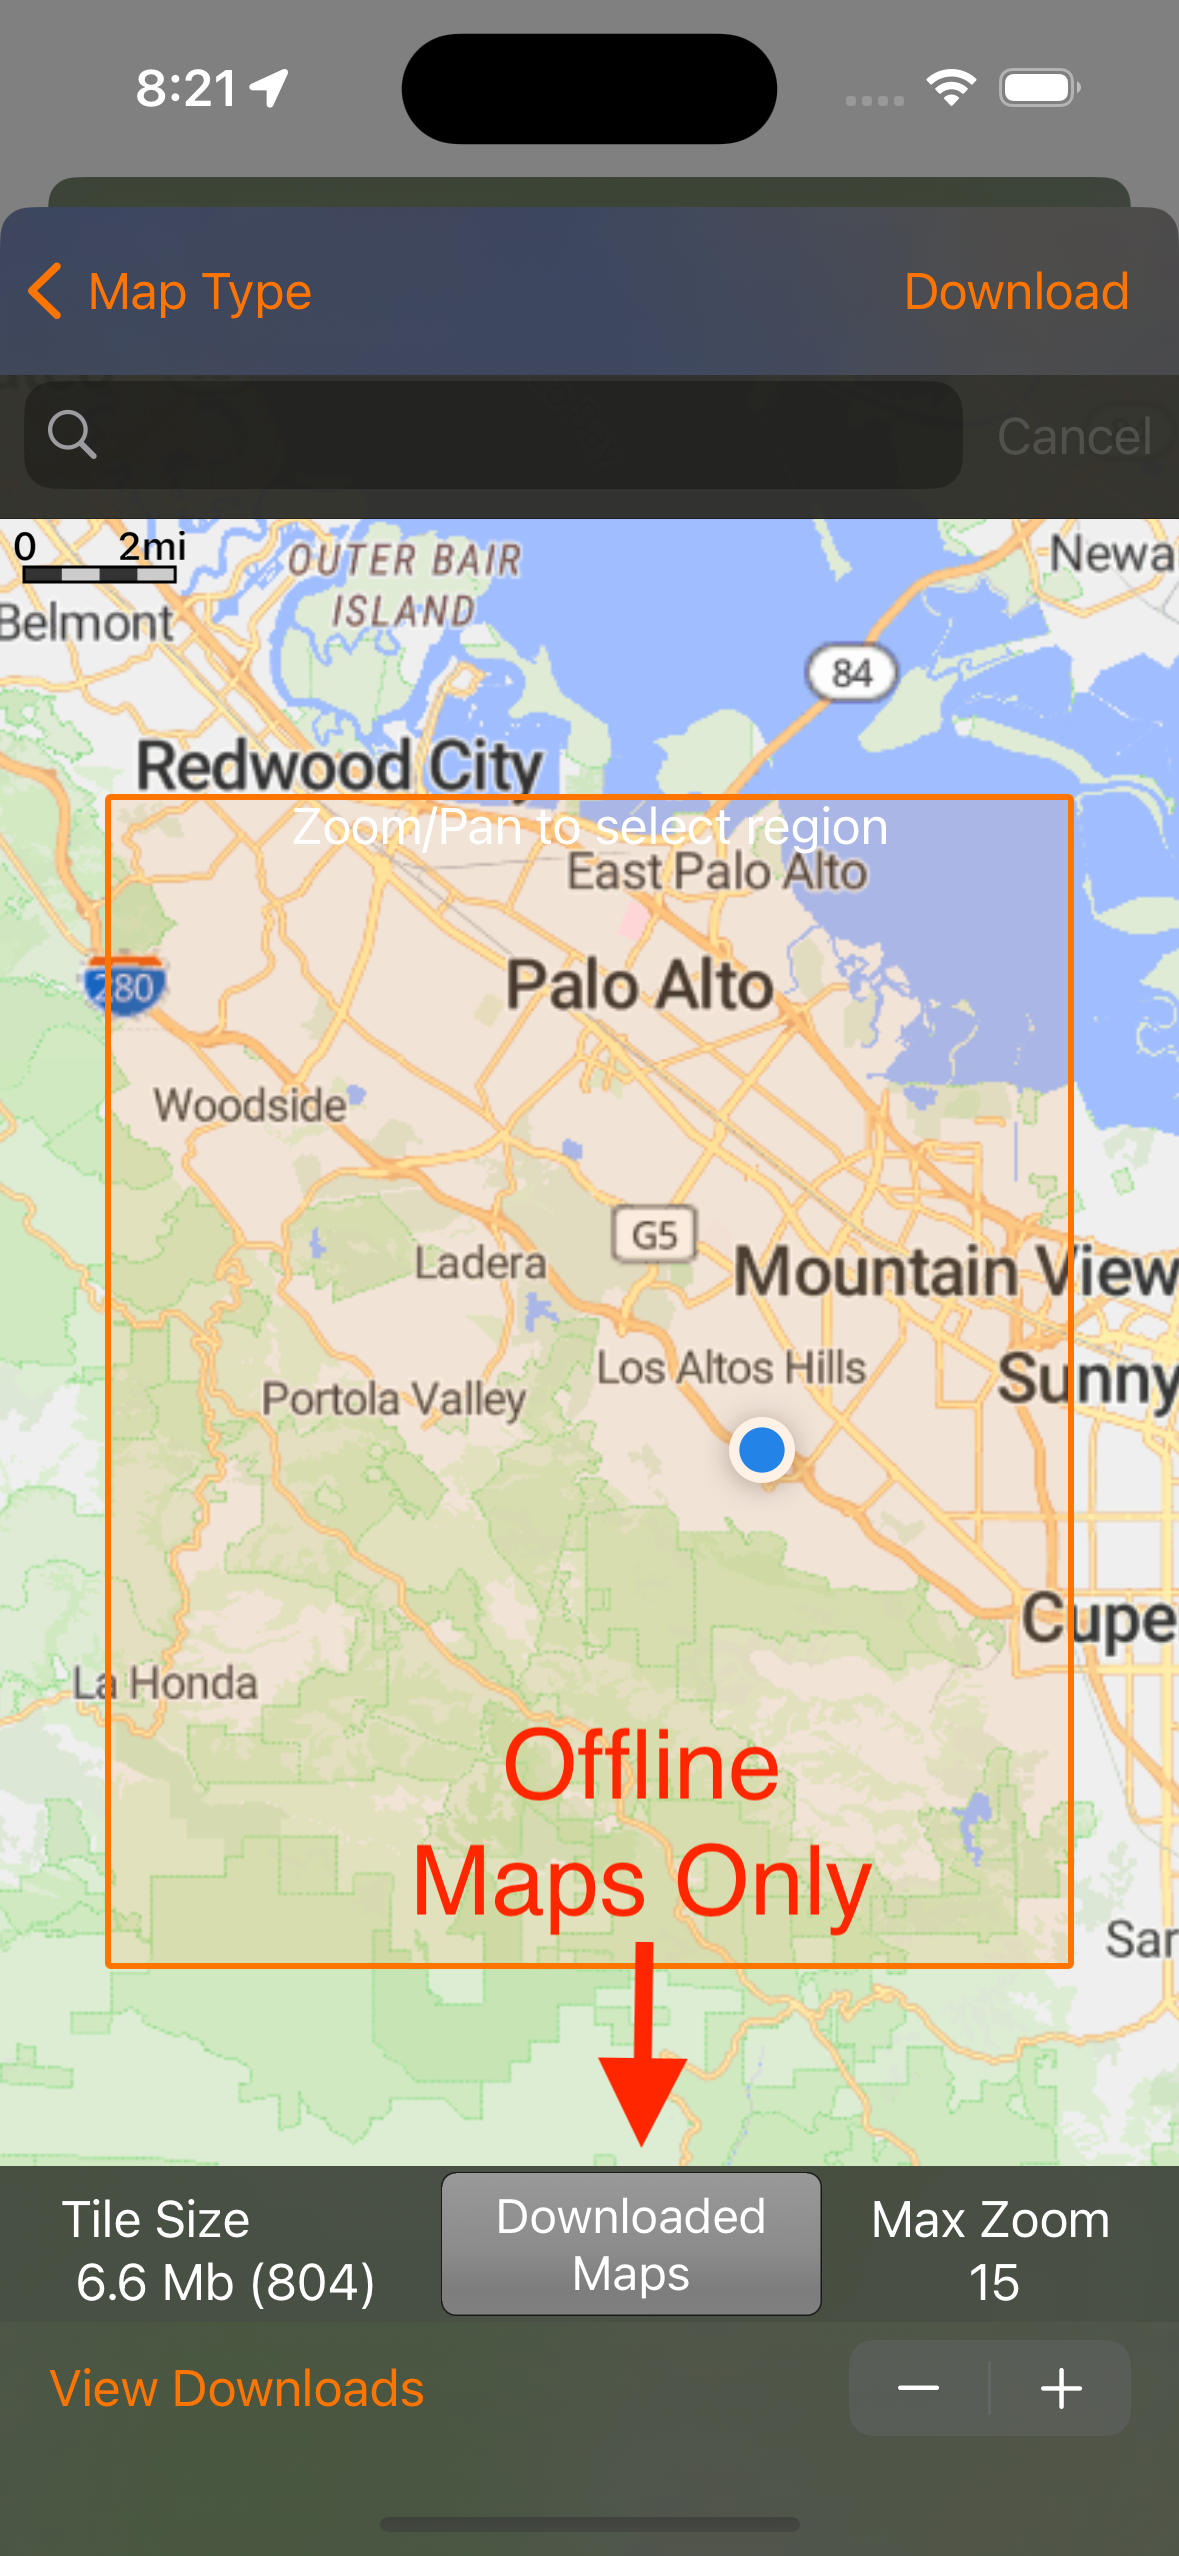
Once in the Download Maps view you can choose the area of interest by zooming and panning the map. The area inside the orange box will be downloaded. You can adjust the max zoom in the bottom right corner. If you want to see only locally stored maps, you can tap on the Offline Maps Only button notated above. When it is blue, the map will only show locally stored maps, when it is gray it will show all maps.
The app will automatically choose downloaded maps over maps from the internet so after you download them you dont have to worry about using offline maps, the app will do this automatically.
Record a Track
To record a track simply press the "Start" button on the top menu bar. This will start drawing a blue line on the main map along your current route.
To pause, or end the current track, press the "Stop" button on the top menu. This will bring up a pop-up menu with the option to "Pause", "Stop and Save", and "Stop and Discard". The "Pause" option will stop recording your track and it will turn off the GPS on the device if you put the app to sleep or switch to another app. The "Stop and Save" option will save the current track to your phone and discard your waypoints. The "Stop and Discard" will end the current track and discard all of the current waypoints.
Waypoints can be added at anytime during a track, as well as an imported or saved track from the Tracks tab. Waypoints that are on the map when the track is saved, will get copied and saved to the track. There is an option in the Settings tab named Keep Waypoints on Map After Save to have the waypoints remain on the map or removed when the track is saved.
The track width on the map can be adjusted in the Settings tab by either a fixed width or adjustable width depending on zoom level.
GPS Tracks Pro
If you need access to offline maps or if you need access to your private map tile server, GPS Tracks Pro subscription is perfect for you! GPS Tracks Pro is an auto-renewing yearly subscription. You need to download the maps first before using them offline, as you cannot download them while there is no internet connection. GPS Tracks Pro allows you to download up to 200 Mb of map tiles per download. There are no limits to the number of downloads.
Here is a list of Features for the GPS Tracks Pro subscription
- Access to GPS Tracks MapsAccess Street, Satellite, and Terrain maps, the most up to date Open Street Maps available. The maps are constantly updated and are available to store on your device for offline use.
- Use Custom Map Source URLsUse your own map tile server or any other map tile server available on the internet. The format is http://{a-d}[or]{0-3}.somservername.com/{z}/{x}/{y}.png.
- Access to Alternate Map SourcesIn addition to GPS Tracks maps, there are also other map tile servers available to use such as TomTom Satellite, Thunderforest, and Accuterra.
- GPS Tracks LiveThis allows you to share your location in real time with your friends. Premium users can share their location with any users with a GPS Tracks account. Pro users can only share their location with other Pro users.
- Track SharingShare and store your favorite tracks online. You can share tracks with your friends or use for yourself. Pro users can store up to 25 tracks and Premium users can share 250 tracks.
- Elevation for WaypointsWhen adding waypoints that are not your current location, the app will retrieve the elevation.
- WeatherWeather will be displayed for each waypoint. This will allow you to add a waypoint anywhere to view the weather at that point.
- Subscription SyncThis subscription will sync over iCloud for use with GPS Tracks HD (iPad version) or any other device with GPS Tracks installed. You must be signed into the same iCloud account on both devices to sync.
GPS Tracks Premium
The premium subscription has all of the same great features of the pro subscription with the addition of the ability to download up to 1 Gb of map tiles at once, with no limit on the number of downloads.
Here is a list of Features for the GPS Tracks Pro subscription
- Download 1 Gb of map tiles at onceThis will allow you to download the maps tiles at a faster rate compared to the Pro subscription.
- Download Premium mapsThis will allow you to download TomTom Satellite, Thunderforrest, and Accuterra for offline use.
- GPS Tracks LiveWith the Premium subscription you can share your location with any user with a GPS Tracks account, they do not need the Pro subscription to follow you.
- Track SharingShare and store up to 250 tracks online.
- Print MapsThis will allow you to print details maps along with your track or waypoint overlays.
- Download Maps for TracksThis will allow you to download maps that follow a selected track or group of waypoints compared to a block of map tiles.
You can manage your subscription from the link in the app or through iTunes. The subscription auto-renewal can be turned off at anytime although subscriptions are generally not available for refunds. The maps are provided by third party companies, these companies can change there policy and/or terms of use which may require them to be removed from the app.
Download Maps for Offline Use
To download maps for offline use, tap the blue Download button next to the maps that you want to download from the Map Selection view. Place the desired map area in the Orange shaded box on the screen, then select the Max Zoom. The max zoom will ranges from 0 - 18, the bigger the Max Zoom, the larger the download and conversely the smaller the area that can be downloaded. When you are ready hit the Download button in the upper right corner to begin. It may take some time to download if you connection is slow. You can always leave the screen to pause it and resume from the View Downloads view.
Once the maps are downloaded you can tap on the View Downloads button to verify that they downloaded. From here you will see a list of all of your downloads. You can tap on any of them to view separately. In this view you will only see the map tiles that are on your device locally. By viewing them this way you can verify that they are on the device. The intent of this view is to verify that the maps have downloaded, once you verified that they downloaded, go back to using the app like normal. The app will use the downloaded maps seamlessly while you are using the app. It first will check the local maps folders, if they are not present then it will try to download it from the internet.
Clear Cache
You can clear the downloaded maps from the View Downloads view as well as the Temporary Cache. To remove downloaded maps, tap the Edit button and then select the map tiles to delete. The temporary cache is stored on the device for maps that are able to be downloaded. This will enable you to use these maps when you are offline even if you did not download them specifically. Since these files are stored in the cache, they could be deleted by the device if you run low on storage. You can clear this cache yourself by tapping the Clear Temp Cache button.
GPS Tracks Live
GPS Tracks Live allows you to share your location in real time with friends. You can set this to always share your location or only when recording which is the default. You can also set the app to record your friends tracks as they happen.
Premium users can share their location with any users and Pro users can only share their location with other Pro users. Anyone who wants to follow you needs an account as well. If you have the Premium subscription, then the other users do not need a subscription to follow you. If you have the Pro subscription the other users would need the Pro subscription.
GPS Tracks Live view can be found from the map menu button or in the settings tab. You can edit your user name and image from the GPS Tracks Account view at the top of the settings tab.
GPS Tracks Live Settings
The settings can be found in the GPS Tracks Live section by tapping on your name at the top. By default tracking only happens when you are recording a track. You can change this to Always if you prefer. The other setting will determine if you want to record your friends track and save it to your device.
GPS Tracks Live Troubleshooting
You can toggle the switch next to the friend to reset the track as well as the stream if you run into issues.
Track Sharing
To share a track, select the track from the track folder to view the track details. Then tap on the track details menu button in the upper right corner and choose the Share Online option. This will upload the track to your account. Pro users can share up to 25 tracks and Premium users can share up to 250 tracks.
Your Tracks
To view your shared tracks, go to the track folder view and tap on the menu button in the upper right corner and choose the View Your Tracks Online option. From here you can change the sharing status or delete the track.
If you want to edit a track, you need to edit the local track and upload it again, it will overwrite the track on the server.
Friends Tracks
To view tracks shared by your friends, go to the track folder view and tap on the View Friends Tracks Online option. From here you can download tracks of interest.
GPS Data / Compass
The GPS Data tab is used to navigate to the next waypoint with the compass as well as view the statistics of the current track and position.
Waypoint View
The top view displays the next waypoint name, distance, bearing, and estimated time of arrival. You can tap this view to open the waypoint view page to edit, check-in, or remove it. When a waypoint is present a Check-In button will appear in the bottom right corner, you can tap this button to indicate that you are finished with the current waypoint and are ready to proceed to the next waypoint. The waypoint will be added to the Previous Waypoints list and the second waypoint will become the current waypoint. To view the list of Waypoints you can tap the Waypoints button at the top of the Map tab.
Statistics Views
There are eleven different statistics that can be displayed, but only four can be shown at once. To change any of the views, simply tap on it and select the new item from the list that appears at the bottom.
- Track TimeThe total time for your current track.
- Current TimeThe current local time.
- Track DistanceThe total distance for your current track.
- AltitudeThe current altitude.
- Elevation AscentThe total ascent during the track.
- Elevation DescentThe total descent during the track.
- GPS AccuracyThe current GPS horizontal and vertical accuracy.
- Speed/PaceThe current speed/pace. This will change according to the Speed Display value in the settings.
- SpeedCurrent speed.
- PaceCurrent pace.
- Average SpeedAverage speed.
- Average PaceAverage pace.
- Glide RatioThe ratio of distance / altitude.
- SlopeThe ratio of you current altitude and distance traveled.
- Slope AngleThe angle of the altitude divided by distance.
- Glide Angle to WaypointThe vertical angle to the next waypoint.
- PressureCurrent pressure as measured by the device.
- Distance to End PointThis is the sum distance of all the remaining waypoints in order.
- ETA to End PointThe estimated time of arrival to the last waypoint.
Compass
The compass can either display your current heading, which is the direction that the device is facing, or it can display your current course heading, which is the direction that you are currently traveling. To change to either the heading or course, just tap the compass, the current setting will be displayed at the bottom of the compass.
If there are waypoints on the map, the compass will display an orange arrow to point in the direction of the next waypoint on the map. To see the next waypoint on the map, tap on the waypoint list button in the toolbar at the top of the Map tab. The first waypoint in the list is the next waypoint, which the compass will indicate with the orange arrow.
 View Current Track Statistics
The View Current Track Statistics button is found right above the heading display denoted by the graph icon. This function is used to display the statistics of your current track being recorded. If no track is being recorded this view will be empty.
 View Current Location
The current location can be viewed by pressing the button with the crosshairs icon. When finished simply swipe the view down to remove it from the display.
Map Measurement Tool
The Map Measurement Tool can be found in the Map tab and enabled by selecting the Ruler button on the right side of the view. It can be used to measure area, distance, and route distance. You can create measurements by either dropping a pin on the map or by drawing with your finger. The units available are miles, feet, kilometers, meters, nautical miles, and yards.
Measurement Modes
There are two modes of measurement. These modes can be used interchangeably in the same measurement.
- DropIn this measurement mode you simply tap the map to create a measurement point. Each point is used to create a new measurement.
- DrawIn this mode, your finger is used to create new measurement points.
Measurement Types
The three types of measurements are area, distance, and route distance.
- AreaThis will measure the area enclosed in the polygon on the map.
- DistanceThis will measure the total distance between all the measurement points on the map.
- RouteThis measurement type will first calculate a driving/walking route between the points and then calculate the distance along the route.
Track Guide
The track guide tool will give you voice guidance when enabled. To enable it just tap on the Get Directions for Track function in the map menu. There are four options. The first option on the left will keep you centered and oriented up while it is enabled. The second option on the left will enable or disable voice commands. The third option will show the calculated turning points along the track. The fourth option runs the track in reverse.
Adding Waypoints
There are seven ways to add waypoints to the map.
- Manually Enter CoordinatesSelect the "+" button from the top menu bar. This defaults to your current location.
- Take a PictureSelect the camera button from the Map Tools menu at the bottom of the Map tab. This will take a picture and attach it to a waypoint on the map at your current location.
- Search for Points of InterestSelect the magnifying glass in the Map Tools menu at the bottom of the Map tab. Then use the searach bar at the top to find points of interest. Tap on the pin and hit the add button to save the waypoint.
- Tap Your Current Location Blue Arrow/DotTap the blue dot on the map and then select the blue round button on the right side of the pop-up.
- Drop a Pin on the MapSelect the Down Arrow from the top menu bar. This will drop a pin on the map. Use the orange arrow to help guide the placement of the pin. Then tap the pin and select the round blue button on the right side of the pop-up.
- Insert Saved Locations as WaypointsSelect the Waypoints tab from the tab bar. This gives you a list of folders or groups of locations. Select a folder to bring up a list of saved locations. Select a location to add it to the map as a waypoint. Select the menu button at the bottom tool bar and select the "Add all Waypoints to Map" to add all of the waypoints in the current folder to the map as waypoints.
- Open Files from Mail or SafariIf you open a KMZ, KML, or GPX file from your mail application or a KMZ, or KML file form Safari it will add any placemarks that are contained in the file as waypoints and add any route as a green track to the map. GPX files cannot be opened from Safari.
Add Waypoint View
The Add Waypoint view will appear when you add a waypoint from any of the first three methods above. It will allow you to edit the Name of the waypoint. You can select the coordinate type from the bar below the table. The definitions for the coordinate types are below -
- Dec - Decimal
- Dm - Degree-minute
- DMs - Degree-Minute-second
- MGRS - Military Grid Coordinate System
- UTM - Universal Transverse Mercator
You can choose to insert the waypoint as the next waypoint or the last waypoint. The exact order of the waypoints can be edited in the Waypoints view on the left menu.
You can choose to add the waypoint as a point or as a vector. Adding a waypoint as a point will allow you to edit the exact coordinates of the waypoint. Adding a waypoint as a vector will allow you to enter a direction and distance as a waypoint.
Saving Waypoints to Your Device
You can save any waypoint to your device for future use. Waypoints will be removed from the map if you either save your track or discard the track. Waypoints will be saved with the track but will not be very accessible. To securely save a location you must save it to the device.
To save a waypoint to your device select the "Save to Favorites" button in the Add Waypoint view. In the Save to Favorites view you must select a "Group" or folder where the location will reside.
Add Waypoints From the Waypoints tab to Main Map
To add a waypoint from the Waypoints tab, simply select it from the list in the Waypoints tab. This will add a COPY of the waypoint to the map in the Map tab. This means if you add any notes to the waypoint or update the coordinates then it will not be saved back to the Waypoints tab. In order to save it back to the Waypoints tab you must view manually save it to the desired location. However, it will be saved with the current track to the Tracks tab with all the updates.
Check-In
When you reach a waypoint, the app asks if you would like to check-in to that waypoint. If check-in is selected then the current waypoint gets added to the previous waypoints list and the next waypoint is now the current waypoint.
Create a Route Manually
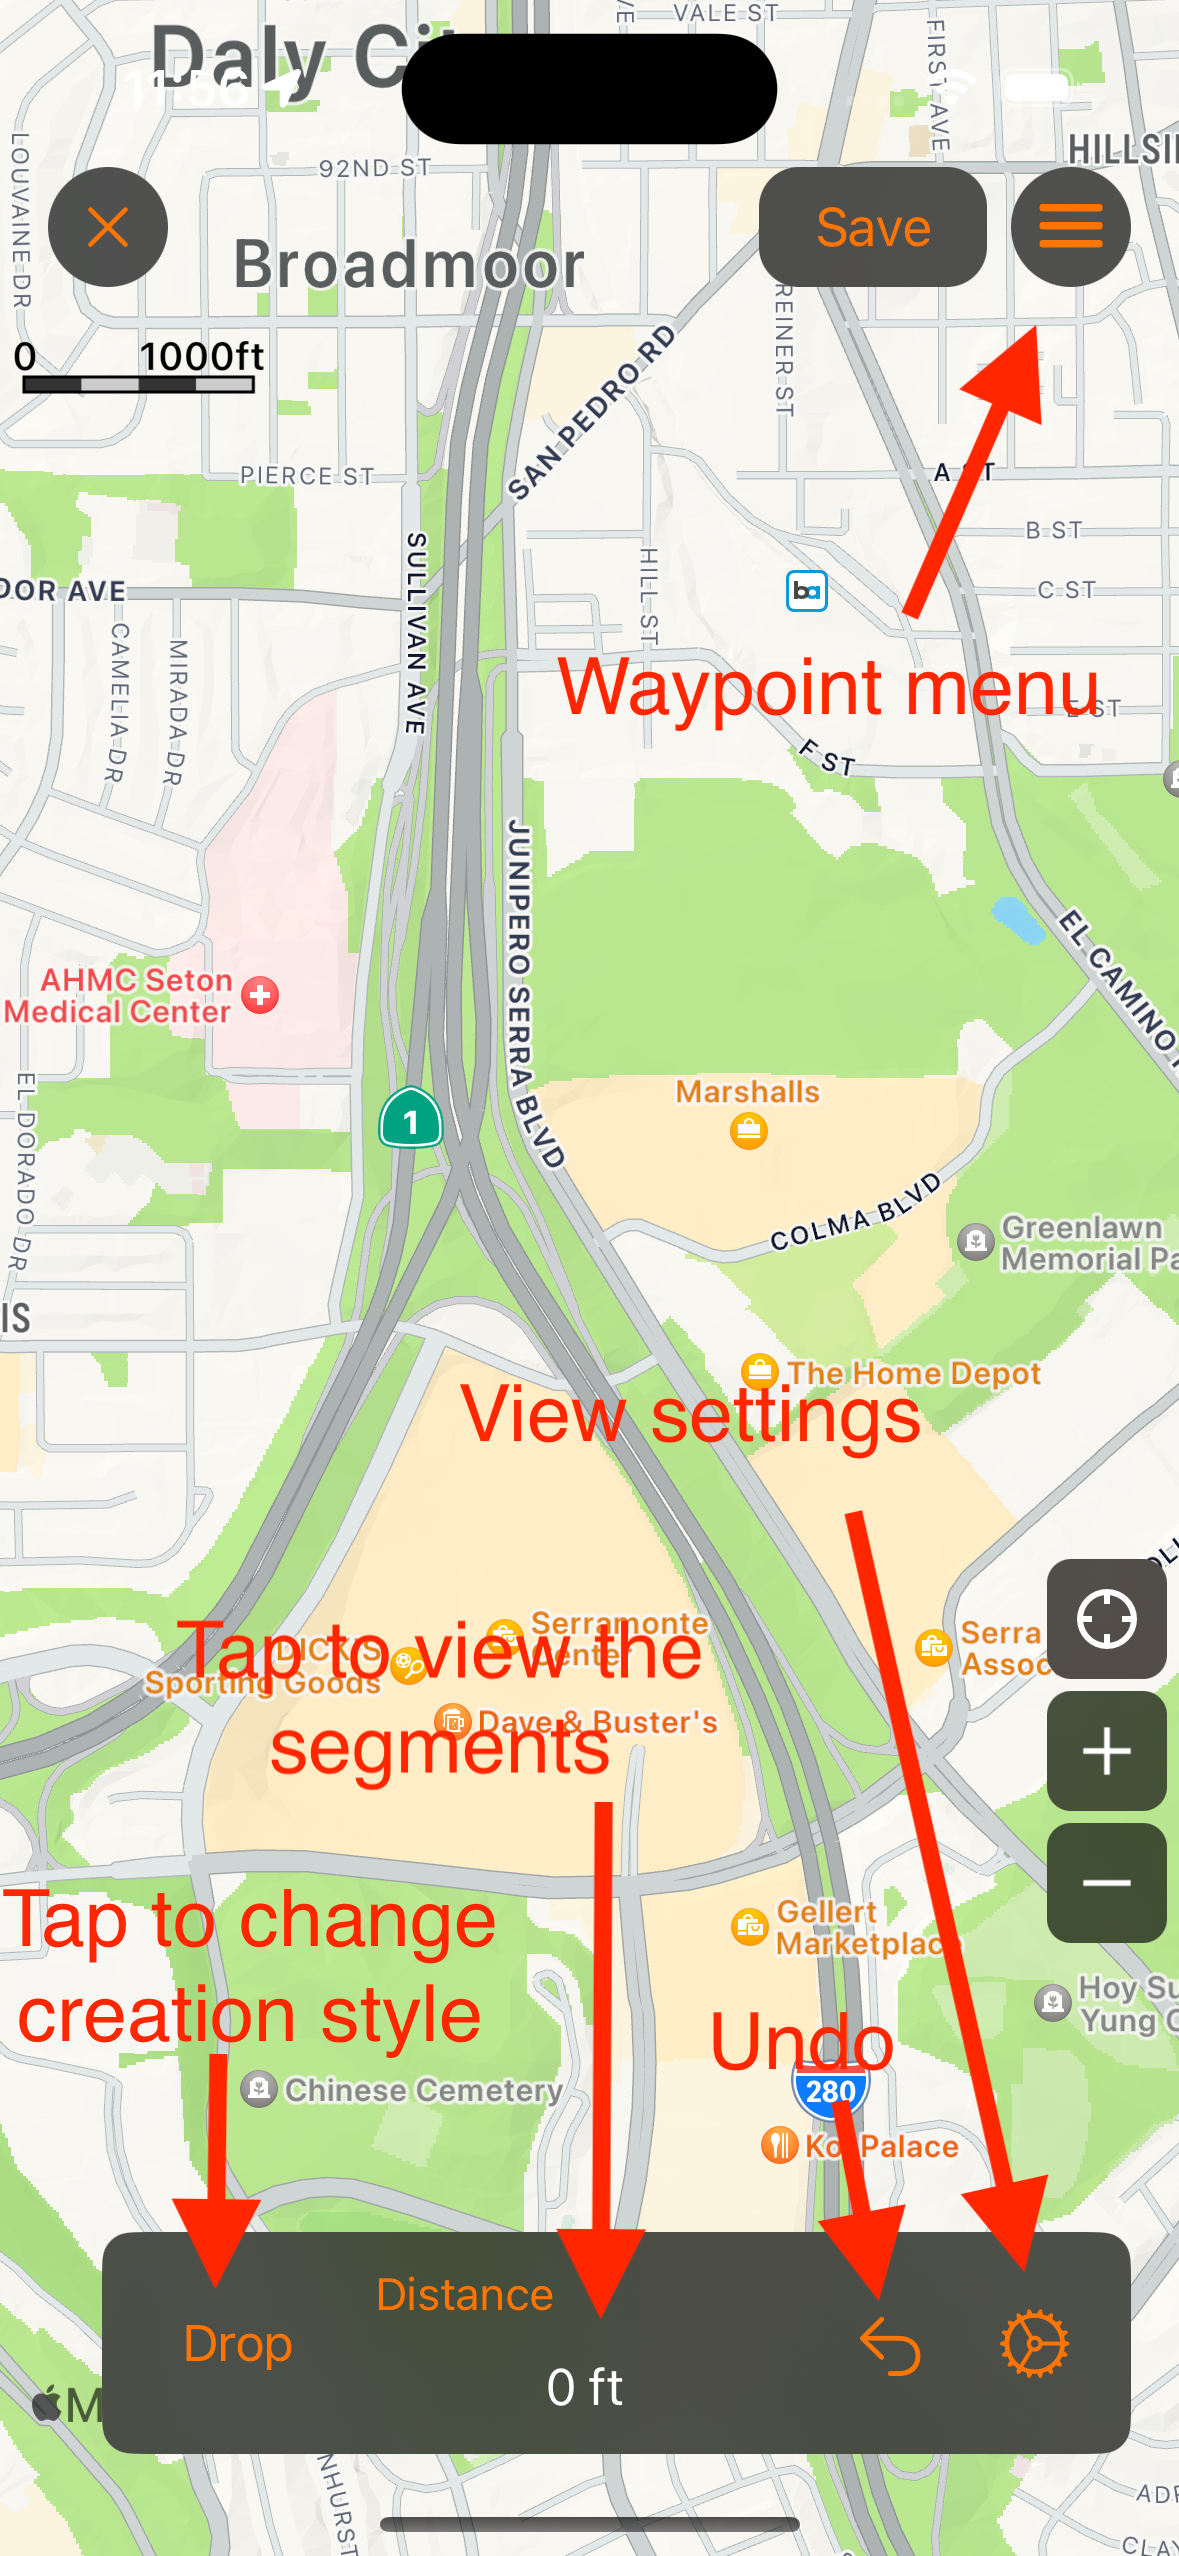
To create a route manually go to the Map tab and select the map meu button on the right side of the map. Any tracks or waypoints on the map will be shown in the create route map view as well. They can optionally be turned off from the create route view settings.
You can create the route using two different methods. The first method is to drop pins on the map and the app will create a route between the two pins. You can add as many pins to the map as needed. Use the Snap to Roads option to create a route along the roads or deselect it to create a route that simply connects the pins directly.
The second method to create a route is by drawing a line on the map. You must first enable drawing by tapping the raw option at the top, then pan/zoom the map in position. When you are ready tap the Draw button at the bottom. When finished drawing tap the End Drawing button. You can pan/zoom the map and begin drawing again if needed. The Snap to Roads option will create a route along the roads or you can deselect this option and create a route along the exact line drawn on the map.
Adding waypoint to the route can be done by entering the waypoints manually by tapping the add button in the waypoint menu in the upper right corner or you can long press directly on the map. To view a list of waypoints on the map, tap the waypoints menu button at the top and select View Waypoints. You can also include the waypoints brought in from the main map to be included with the new track from the view settings menu.
The view settings menu included the ability to hide or show the waypoints and tracks from the main map. The option to include the waypoints. The snap to roads toggle option. and the Driving or Waling directions type.
menuConvert Coordinates
To convert a coordinate to a different coordinate set, simply select the "+" button from the top menu and enter the coordinate that you would like to convert in any of the five available coordinate systems. After you have entered it in then select the coordinate system that you would like to convert it to.
When you are finished you can select "Insert Waypoint" to add a new waypoint or tap outside of the pop-up view to exit the view.
Send a Link to a Friend with Email or Text Message
You can send a link to your friends via email or text message (this is available in IOS 5.0 and up). The link will open up either the Google Maps app or GPS Tracks with the location marked with a pin. This can be useful to send someone a link with your current location.
Waypoints
To send a link to the location from any waypoint, tap on the waypoint pin on the map and select the round blue button on the right side of the pop-up view. This will bring up the Edit Waypoint view. Select the menu button on the left of the bottom tool bar. Select either "Email" or "SMS".
Saved Locations
To send a link to the location that is saved to the device, browse to the location in the location tab or the menu at the left. Select the round blue button next to the location. This will bring up the Saved Location Detail view. Select the menu button on the right of the bottom tool bar. Select either "Email" or "SMS".
Getting Directions From Third Party Apps
You can send any waypoint or save location to either the default Maps app, the Navigon app, the Google Maps app, the TomTom app, or the Sygic app.
Waypoints
To send the location to the third part app from any waypoint, tap on the waypoint pin on the map and select the round blue button on the right side of the pop-up view. This will bring up the Edit Waypoint view. Select the menu button on the upper right corner, then select the desired app.
Saved Locations
To send a location that is saved to the device, browse to the location in the Waypoints tab. Select the round blue button next to the location. This will bring up the Saved Location Detail view. Select the menu button on the waypoint pin on the map and select the round blue button on the right side of the pop-up view. This will bring up the Edit Waypoint view. Select the menu button on the upper right corner, then select the desired app.
Siri
There are two things required to use Siri with GPS Tracks, first you must state the action and second you must include the app name.
Supported Actions
- Start
- Stop
- Pause
- Resume
- Cancel
Examples
- "Hey Siri, start a track with GPS Tracks."
- "Hey Siri, stop recording the track with GPS Tracks."
- "Hey Siri, pause the track recording with GPS Tracks."
- "Hey Siri, resume recording with GPS Tracks."
- "Hey Siri, cancel recording the track with GPS Tracks."
Import Files
You can import five different file types - KMZ, KML, GPX, NMEA, CSV, and BIN
There are three ways to import a file.
- iTunes File Sharing
- Mail app
- Any installed cloud sharing service
You can import a file from three different areas but all will have the same results. The waypoints or placemarks will be saved to the device in the Waypoints tab and the routes or tracks along with the waypoints will be saved to the Tracks tab.
If you open a file from the Mail app or the Safari app then a copy of that file is saved to your device so you can import if you need to. Opening a file from the Mail app or the Safari app does not save the contents to the waypoints or imported routes sections of the GPS Tracks, but you will be asked if you would like to save the data to the app upon opening.
You can import a file into GPS Tracks from the menu of the following areas which all yields the same result-
- The folder view in the Waypoints tab.
- In a specific waypoint folder
- In the Tracks tab
iTunes File Sharing
Use this link to learn how to share files between your computer and device - Apple File Sharing Support
Mail App
You can open a file that is emailed to you from the default Mail app with GPS Tracks. To open the file, hold your finger on the file for two seconds until a menu appears. Select the "Open with..." option and then select GPS Tracks. In IOS 6 this process is slightly different in that the menu that appears initially after you hold your finger on the file for two seconds, should have Open in GPS Tracks option.
Cloud Services
To use any third party cloud service such as iCloud Drive or Dropbox, you must first have the app installed. Once installed, the option to save it to the respective service will appear in GPS Tracks. Please note that you may have to open the app first and in some cases, you may need to open the Apple Files app and add the service for it to appear in GPS Tracks.
BIN Format
The BIN format is used to export a recorded track to be imported to another GPS Tracks app.
KMZ and KML Files
There are many different implementations of the KML file format. GPS Tracks only supports a subset of the tags. The tags that are supported for waypoints are the "Placemark" with a "Point". The tags that are supported for a route or a track are "LineString" with "coordinates".
GPX Files
All tags are supported for the GPX format.
NMEA Files
The app will treat any files with the extension of .NMEA or .LOG as an NMEA file. The app only supports the following three NMEA messages - $GPWPL, $GPGGA, and $GPRMC.
CSV Files
The CSV file format can only import waypoints, it cannot import routes or tracks. There are two CSV formats that it will support. The first format for the CSV file is Latitude, Longitude, Name, Altitude, Notes. The second, which is the same as the CSV export is Date, Name, Latitude, Longitude, Altitude, Notes
- Latitude, Longitude, Name, Altitude, Notes
- Date, Name, Latitude, Longitude, Altitude, Notes
Export Files
You can export four different file types - KML, KMZ, GPX, CSV, Image, HTML, and BIN.
You can export waypoints from the Waypoints tab and you can export tracks from the Tracks tab. Waypoints and tracks can be emailed from the Export menu as well.
Once you have exported a file it will be saved to the device and can be retrieved via iTunes File Sharing.
KMZ Format
The KMZ format will export not only the track and waypoints but also it will export any photos associated with the waypoints. Once it is exported you can open the file in Google Earth to view the waypoints along with the photos.
CSV Format
The CSV file format is below.
- Date, Name, Latitude, Longitude, Altitude, Notes
Exporting Images
To export images that are attached to waypoints, choose either the KMZ or HTML format. The KMZ format is explained above and the HTML format will export the images and link them in a simple webpage.
iTunes File Sharing
Use this link to learn how to share files between your computer and device - Apple File Sharing Support
Cloud Services
To use any third party cloud service such as iCloud Drive or Dropbox, you must first have the app installed. Once installed, the option to save it to the respective service will appear in GPS Tracks. Please note that you may have to open the app first and in some cases, you may need to open the Apple Files app and add the service for it to appear in GPS Tracks.
Opening Files with GPS Tracks
Opening Files from the Mail app
You can open a KMZ, KML, or GPX file from the Mail app. Tap and hold your finger over the file and wait until a pop-up menu appears. Select the "Open with" option and select GPS Tracks from the menu. When you open a file with GPS Tracks, the contents are displayed on the map as waypoints and routes, but they are not saved in the app. To save the waypoints and routes to the app, you must import the file. See the Import page for further details on importing files.
Opening Files from Safari
You can open KMZ or KML files from Safari. GPX files cannot be opened from Safari. To open a file, tap on the link to the file. A screen will appear, select the "Open with" option and select GPS Tracks from the menu. When you open a file with GPS Tracks, the contents are displayed on the map as waypoints and routes, but they are not saved in the app. To save the waypoints and routes to the app, you must import the file. See the Import page for further details on importing files.
Settings
Measurement Units
- Feet - imperial units
- Meters - metric units
- Nautical - imperial units except nautical miles and knots are used in place of miles and mph.
Speed Display
- Auto - will automatically select the correct units based on the rate of travel. If the velocity is greater than 10 mph or 16 kph then it will display speed, otherwise it will display pace.
- Pace - will display the velocity as time per distance or pace
- Speed - will display the velocity as distance per time or speed
Map Type
- Apple Street Maps - This is the basic street map
- Apple Satellite Maps - This is the map composed of satellite images
- Apple Hybrid Maps - This is the map composed of satellite images with the street name overlays
There are a more maps available to use with the GPS Tracks Pro subscription. Click here for more details.
Coordinate Display
- Dec - Displays coordinates in decimal format
- Dm - Displays coordinates in whole degree and fractional minute format
- DMs - Displays coordinates in whole degree, whole minute, and fractional second format
- MGRS - Displays coordinates in Military Grid Coordinate System format
- UTM - Displays coordinates in Universal Transverse Mercator format
UTM Display
- Hemisphere - This will display the UTM coordinates with either an N or S after the zone number denoting the Northern or Southern hemisphere
- Latitude Band - This will display the UTM coordinates with the latitude band after the zone number
Datums
The app uses WGS-84 by default and over 220 datums are available with an In-App purchase. All coordinates and displays will show values in the selected datum.
Compass Display
- Degrees - Compass display units in degrees
- Mils - Compass display units in Mils with 6400 mils equal to 360 degrees
Compass Heading
- True - Compass display true heading, this requires the compass location service to be set to ON
- Magnetic - Compass display the magnetic heading
Map Compass
- Heading - The compass on the Map tab will display current heading. This will also rotate the user location arrow on the map with the current heading. When "Rotate Map with Heading" is set to ON, then the map will rotate with the current heading.
- Course - The compass on the Map tab will display current course heading. This will also rotate the user location arrow on the map with the current course heading. when "Rotate Map with Heading" is set to ON, then the map will rotate with the current course heading.
Display Compass Calibration Alerts
When enabled, this setting will show the compass calibration messages when needed.
Pressure Units
- Millibars - The pressure will be shown in millibars.
- Inches of Mercury - The pressure will be shown in inches of mercury.
Sound
Turn on or off the sounds effects.
Disable Rotation
This will disable the app from rotating into landscape layout.
GPS Background Navigation Precision
- Nav - This is the highest possible accuracy which adds emphasis on improving the devices ability to detect its position and direction. This is good for point to point off-road navigation. This feature is only recommend if you require precise bearing to your next waypoint.
- Best - This is the best accuracy from the GPS unit but without the extra direction detection from the Nav setting. This setting is recommended users who need to be alerted when a waypoint is reached.
- High - Med - Low - These settings are similar to the Best setting except that it does not wake the device as often, which saves the battery. If waypoint alerts are not needed, then it is recommended to use either Med, or Low.
There is no difference between the Best, High, Med, and Low setting when the app is on the screen.
Show User Location Arrow
This will display a blue arrow for the current user location instead of the standard blue dot. The blue arrow will rotate with the current heading or course depending on the Map Compass setting.
Rotate Map With Heading
This will rotate the map with your heading so map will always be oriented in the direction that you are facing. This feature is used in conjunction with the "User Location" button. When the "User Location" button is highlighted blue the map will rotate otherwise it will not rotate.
Map Coordinate Display
- User - This will display the current location of the user.
- Center - This will display the coordinates of center of the map as you pan. This feature is best used in conjunction with the Arrow in Center of Map feature to highlight the map center. This is very handy when you are looking for a certain point on the map or when you need to know the location of a feature on the map.
Show Crosshairs on Map
This will display a crosshair in the center of the map. This is where waypoints will be dropped if using the drop a pin on the map method and it can be used to show the location in the Map Coordinate Display view.
Center User on Map at Bottom
This center the user at the bottom of the screen when used in conjunction with the Rotate Map with Heading option. Otherwise it has no effect.
Track Width Type
- Default - This will display the tracks in a scaled mode proportional to the road width.
- Scaled - This will display the tracks in a scaled mode proportional to the road width multiplied by the multiplier in the Track Width setting slider.
- Fixed - This will display the tracks with a width adjusted by the Track Width setting slider.
Show Points of Interest
This will display points on interest on the map when available.
Show Traffic
This will display traffic conditions only on Apple Maps when available.
Show Road Names for Custom Maps
This will display the street names for third party maps in the GPS Tracks Pro subscription.
Show MGRS Grid
This will display the MGRS grid on the map. It is recommended that this not be turned on when recording a track in the background due to the large amount of RAM needed to display the grids.
Show Track Start/Stop Pins
This will display a small green point on the map when you start a track and a small red point where you stop a track. This also applies to tracks added to the main map from the Tracks tab.
Hide Waypoint Images on Map
This will show a waypoint that has an image attached as a map pin. When this is off, any image that is attached to the waypoint will appear as the map marker on the map.
Show Waypoint Lines on Map
This will display the orange line that connects each waypoint in ascending order. This is helpful for navigating to an ordered list of waypoints.
Waypoint Alert Radius
This setting will determine the alert radius when Display Check-In Alerts is enabled.
iCloud
Turn this on the sync your tracks, waypoints, and settings across all versions of GPS Tracks.
Sync iCloud Now
This will trigger iCloud to begin a full sync. This could take a few minutes depending on how much data is in the app. This will also show the last iCloud sync date.
Auto Export to Dropbox
This will export the selected file type of the last recorded track to Dropbox after you stop recording.
Unlink Dropbox
Select this to unlink your Dropbox account from this app.
Image Export Size
This will reduce the size and quality of the images exported from the app when using either the KMZ or HYML file formats.
Disable Sleep Mode
This will disable the device from automatically going to sleep while using app. The device will go to sleep if it is left untouched for a few minutes and the screen will go dark. With this setting turned on, it will allow you to leave the device untouched but still view the screen for an indefinite period of time.
Disable Check-In Alerts
This will disable all waypoint check-in alerts. This is only active if you are recording your track.
Auto Import Pictures as Waypoints During Track
This will import any image in your photo library that was taken while you were recording the track. This is useful if you have another app that takes specialized images. This is also handy if you want to take a picture with the default camera app instead of opening GPS Tracks.
Keep Waypoints on Map after Save
This will keep any waypoints on the map after you save a track, otherwise they will be removed from the main map. This does not affect the saving of all the waypoints with the track to the Tracks tab.
Keep Tracks on Map after Save
This will keep the current track on the map after you save it to the Tracks tab. The track will turn to a red color once it is saved. This does not affect the track being saved to the Tracks tab.
Auto Hide Map Toolbar
This will hide the top toolbar on the map tab after 5 seconds of inactivity on the map to give user more viewing area of the map.
Auto Pause When Stopped
This will pause the app while you are tracking your location if you stop for more than approximately 30-45 seconds. It will resume tracking if it detects that you have begun to move again. If this mode is enabled and you stop for more than five minutes while the app is in the background then it will turn off the GPS to save the battery life, but since the GPS is off it cannot start tracking again until the user presses the "Start" button on the top menu bar of the Map view.
Auto Name Images
This will use machine learning to determine the objects in the image to use as a name for the waypoint when taking a picture.
Ground Overlay Transparency
This will make ground overlay images transparent, that are imported from KMZ files.
ETA Time Absolute
This will display the estimated time of arrival in a time of day instead of number of minutes.
Disable Export of Start & Stop Pins
This will exclude auto generated waypoints to mark the start and stop locations in exported files such as GPX and KML formats.
Prompt for Waypoint Name When Taking a Picture
This will prompt the user to enter a name for a waypoint after taking a picture.
Troubleshooting F.A.Q.
GPS Tracks Pro or Premium is not showing as purchased
If you have already purchased the subscription, then you can tap on the subscription link at the top of the Settings tab. Then scroll down to the bottom and tap on the Restore button. This will refresh your subscription in the app.
App will not open or crashes when launched
If the app will not open, then try opening the iPhone or iPad Settings app for the device. Then scroll down to the Installed Apps section and select GPS Tracks. Then disable the Auto Restore Map Data option and open the app. When you open it, there may be a prompt to restore the data on the map, select No to not restore the data. This will not delete any data, except for a track that was being recorded, the rest of the data on the map will be saved in the Waypoints or Tracks tabs.
Cannot find the Start/Stop button
If the dashboard is hidden in the Map tab, then you can slide your finger down from about 1/4 to 1/2 inch from the top to bring the dashboard back into view.
Dropbox Auto Export Not Working
You can try logging out of Dropbox and then toggling the auto export format switch. Make sure you have the Dropbox app installed, otherwise you cannot log in.
Cannot find the menu on the right side of the map
If the map toolbar is missing from the right side of the map, you can long press on the map for two seconds to reveal the map menu where you can edit the map toolbar items.
How do downloaded maps work?
See the Download Maps section
How do you view the track details or change the name of a track
The track detail view graph can be swiped up to reveal the track details where you can edit the track, customize the view, or view the detailed stats for the track.
Location is inaccurate or not present
When the user location (blue dot) is not present on the map this is usually caused by the Location Services not being enabled in the iPhone settings. To enable the Location services for the app follow the steps below.
- Go to the iPhone settings
- Verify that the iPhone is not in Airplane Mode
- Select "Privacy"
- Select "Location Services"
- Verify that Location Services is set to "ON" at the top
- Scroll down to GPS Tracks and set the switch to "ON"
The user location should now be present on the map.
How to email a track or list of waypoints
To email a track or list of waypoints, first select the track or waypoint folder in the respective tab. Then tap on the menu button in the upper right corner and select the Export option. Choose the file format and then select the Share File option. This will allow you to share the file via email, text message, AirDrop, or any other sharing capability that may be installed on your iPhone.
How do I sync waypoints I create within iPhone app to my Apple Watch?
If you tap on the Share button while viewing the waypoint details, there is an option in the bottom row of the menu to Send to Watch. This will make the waypoint appear in the third screen of the watch app. You can send multiple waypoints to the watch. You can control which waypoint is displayed by deep pressing on the third screen and then tap on the waypoint of interest.
How do I navigate to a waypoint?
You can navigate to a waypoint by adding it to the main map and then tapping on the pin to view the details. Then tap on the Navigate button at the bottom. The distance and bearing information will now appear in the GPS Data tab. The bearing will also be indicated by the orange arrow on the compass.
App is not functioning correctly or did not load properly
Sometimes the app can get locked up in a bad state and not function properly even after closing and reopening the app. When this happens it is good to reset the app entirely. This can be done with the steps below.
- Close GPS Tracks
- Double click on the iPhone Home button - this is the round button with the square on it below the screen
- The multitasking menu should pop up at the bottom of the screen, find the GPS Tracks app, you may have to scroll to the right
- Swipe up on GPS Tracks to stop it from running.
- Now restart GPS Tracks, it should reinitialize properly this time
x-callback-url
/startTracking
- Action - startTracking
- Parameters - none
- Description - This will start recording a track.
- Examples
- gpstracks://x-callback-url/startTracking
/stopTracking
- Action - stopTracking
- Parameters -
- stopAction [string:required] : This will let you choose to save or delete the track. The two options are "save" or "delete".
- trackName [string:optional] : This will be the name of the track if you want to save it.
- Description - This will stop recording a track and either save it with the track name or delete it.
- Examples
- gpstracks://x-callback-url/stopTracking?stopAction=save&trackName=Track1
- gpstracks://x-callback-url/stopTracking?stopAction=delete
/pauseTracking
- Action - pauseTracking
- Parameters - none
- Description - This will pause recording of a track if it is already recording.
- Examples
- gpstracks://x-callback-url/pauseTracking
/addWaypoint
- Action - addWaypoint
- Parameters -
- waypointName [string:optional] : This will be the name of the waypoint.
- waypointFolder [string:required] : This is the name of the folder in which the waypoint will be saved. If the folder does not exist, then it will be created.
- latitude [string:optional] : Latitude of the waypoint in decimal format.
- longitude [string:optional] : Longitude of the waypoint in decimal format.
- Description - This will save a waypoint in the app. If the latitude or longitude are left blank then it will try to use your current location.
- Examples
- gpstracks://x-callback-url/addWaypoint?waypointname=wpt1&waypointFolder=Hiking&latitude=37.3324&longitude=-122.0312
- gpstracks://x-callback-url/addWaypoint?waypointname=wpt1&waypointFolder=Hiking
- gpstracks://x-callback-url/addWaypoint?waypointFolder=Camping